Astro も Tailwind CSSも3系で時代が止まっていたので、Astro 5系・Tailwind CSS 4系のはじめ方を確認したメモです。
Astro や Tailwind CSS(3系)を見たことがある人向け。
Astroプロジェクトのはじめ方とTailwind CSS の入れ方
- Astro の Getting Started https://docs.astro.build/en/getting-started
- Astro の Install Tailwind CSS with Astro https://docs.astro.build/en/guides/styling/#add-tailwind-4
- Tailwind CSS の Install Tailwind CSS with Astro https://tailwindcss.com/docs/installation/framework-guides/astro
npm create astro@latest でAstroプロジェクトを作る
D:\path\to\project> npm create astro@latest

> npx
> create-astro

 astro   Launch sequence initiated.

   dir   Where should we create your new project?
         ./astro5-tailwind4

  tmpl   How would you like to start your new project?
         A basic, helpful starter project

  deps   Install dependencies?
         Yes

   git   Initialize a new git repository?
         No
      ◼  Sounds good! You can always run git init manually.
これでしばらく待つとファイル群が生成されます。以下のようなメッセージが出て終わり。
      ✔  Project initialized!
         ■ Template copied
         ■ Dependencies installed

  next   Liftoff confirmed. Explore your project!

         Enter your project directory using cd ./astro5-tailwind4
         Run npm run dev to start the dev server. CTRL+C to stop.
         Add frameworks like react or tailwind using astro add.
※ Node.js は v22.16.0でやりました
※ 最初にNeed to install the following packages: が出たら y します。
Astroプロジェクトの中で npx astro add tailwind で Tailwind CSSをインストールする
AstroとTailwind CSSとで使い方の説明が違うのですが、いったん簡単に使いたいので npx astro add tailwind でやります。
- Astro の Install Tailwind CSS with Astro https://docs.astro.build/en/guides/styling/#add-tailwind-4
npx astro add tailwind
- Tailwind CSS の Install Tailwind CSS with Astro https://tailwindcss.com/docs/installation/framework-guides/astro
npm install tailwindcss @tailwindcss/vite
D:\path\to\project> cd astro5-tailwind4
D:\path\to\project\astro5-tailwind4> npx astro add tailwind
✔ Resolving packages...

  Astro will run the following command:
  If you skip this step, you can always run it yourself later

 ╭────────────────────────────────────────────────────╮
 │ npm i @tailwindcss/vite@^4.1.8 tailwindcss@^4.1.8  │
 ╰────────────────────────────────────────────────────╯

? Continue? » (Y/n)
ここで確認されているコマンドが npm install tailwindcss @tailwindcss/vite と一緒でした。
✔ Installing dependencies...

  Astro will scaffold ./src/styles/global.css.

√ Continue? ... yes

  Astro will make the following changes to your config file:

 ╭ astro.config.mjs ─────────────────────────────╮
 │ // @ts-check                                  │
 │ import { defineConfig } from 'astro/config';  │
 │                                               │
 │ import tailwindcss from '@tailwindcss/vite';  │
 │                                               │
 │ // https://astro.build/config                 │
 │ export default defineConfig({                 │
 │   vite: {                                     │
 │     plugins: [tailwindcss()]                  │
 │   }                                           │
 │ });                                           │
 ╰───────────────────────────────────────────────╯

√ Continue? ... yes

   success  Added the following integration to your project:
  - tailwind

   action required  You must import your Tailwind stylesheet, e.g. in a shared layout:

 ╭ src/layouts/Layout.astro ─────────╮
 │ ---                               │
 │ import './src/styles/global.css'  │
 │ ---                               │
 ╰───────────────────────────────────╯
これでastro.config.mjs に以下の部分が追加されます。
import tailwindcss from '@tailwindcss/vite';

// https://astro.build/config
export default defineConfig({
  vite: {
    plugins: [tailwindcss()]
  }
});
それから src/styles/global.css に @import "tailwindcss"; と書かれている状態になります。
Layout.astro で global.css を importする
src/layouts/Layout.astro の一番上に以下を追加。
---
import "./src/styles/global.css";
---
index.astro に tailwind を書いてみる
<Layout>
	<Welcome />

	<div class="container mx-auto px-4 py-8">
		<h1 class="text-3xl font-bold mb-4">
			Welcome to Astro with Tailwind CSS!
		</h1>
		<p class="mb-4">
			This is a simple starter template to help you get started with Astro
			and Tailwind CSS.
		</p>
		<p>Feel free to customize it as you like!</p>
	</div>
</Layout>
npm run dev してページを開く
以下のような感じで http://localhost:4321/ で確認可能になります。
D:\path\to\project\astro5-tailwind4> npm run dev

> astro5-tailwind4@0.0.1 dev
> astro dev

21:45:36 [types] Generated 1ms
21:45:36 [content] Syncing content
21:45:36 [content] Synced content

 astro  v5.8.1 ready in 1353 ms

┃ Local    http://localhost:4321/
┃ Network  use --host to expose

21:45:36 watching for file changes...
Tailwind CSS v4 系の設定方法
エディタの設定
VS Code のプラグインは https://tailwindcss.com/docs/editor-setup の説明を見ればOK。
デザイントークン
- Theme variables https://tailwindcss.com/docs/theme
global.cssに @theme{} でCSS変数(カスタムプロパティ)を書いていくと自動でユーティリティクラス生成などがされる仕組み。
@import "tailwindcss";

@theme {
    /* Font families */
    --default-font-family: "Helvetica Neue", Arial, "Hiragino Kaku Gothic ProN","Hiragino Sans", Meiryo, sans-serif;

    /* Color palette */
    --color-primary: #2A1673;
    --color-black: #0A0A0D;
    --color-primary-light: #9389D9;
    --color-secondary: #1D2240;
    --color-secondary-dark: #141726;

    /* spacing */
    --spacing-xlg: 80px;
    --spacing-lg: 40px;
    --spacing-md: 20px;
    --spacing-sm: 10px;
}
例えば、
--color-primary を設定すると、.text-primary や .bg-primary が、
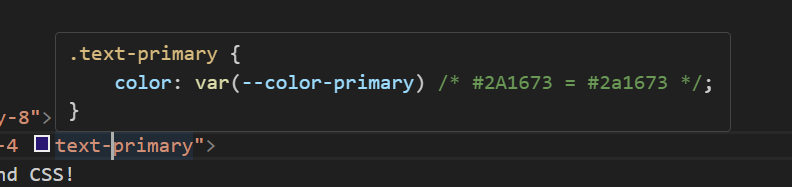
--spacing-xlg を設定すると、 .py-xlg や .scroll-my-xlg が生成されます。
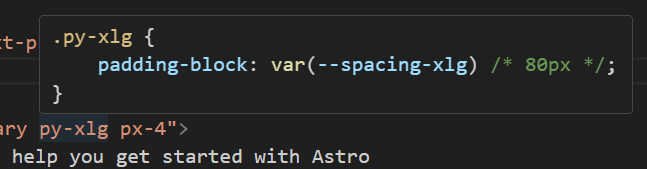
https://tailwindcss.com/docs/theme の「Theme variable namespaces」をみると、どういう命名で設定すれば何が設定できるかが、ある程度はわかります。
(Spacing and sizing utilities like px-4, max-h-16, and many more みたい and many more 系もあるけど……)
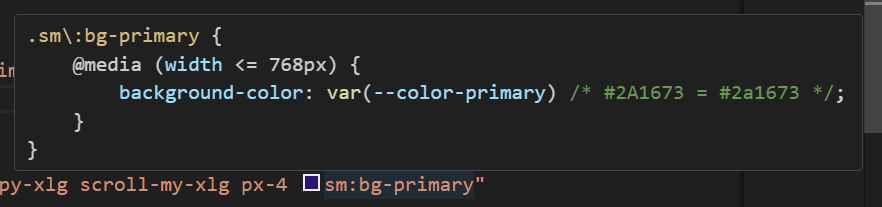
ブレイクポイントをデスクトップファースト構成にする
Tailwind CSSはモバイルファーストのブレイクポイントシステムを使っています。
が、デスクトップファーストでデザインが作られているときにモバイルファーストでCSSを書くのは頭を使うので、いったんデスクトップファースト構成に変えてみます。
ただしTailwind CSS v3 のときのようなオプションは無いため、Stack Overflowで紹介されていた、デフォルトのブレイクポイントを消してから作り直す方法を使います。
https://stackoverflow.com/questions/79607461/make-tailwind-v4-desktop-first
@theme {
  --breakpoint-*: initial;
}

@custom-variant xlg (@media (width <= 1440px));
@custom-variant lg (@media (width <= 1280px));
@custom-variant md (@media (width <= 1024px));
@custom-variant sm (@media (width <= 768px));
--breakpoint-*: initial; とすると、デフォルトのブレイクポイント設定を削除できます。
そのうえで @custom-variant でメディアクエリ用の宣言を追加すると、sm:ほにゃらら のようなクラス名で @media (width <= 768px) のようなCSSを出力できます。
Webフォント(Fontsource)を使う
https://docs.astro.build/ja/guides/fonts/#fontsource%E3%82%92%E4%BD%BF%E3%81%86
D:\path\to\project\astro5-tailwind4> npm install @fontsource-variable/josefin-sanssrc/layouts/Layout.astro の一番上に以下を追加。
---
import "@fontsource-variable/josefin-sans";
import "./src/styles/global.css";
---
global.cssの@themeに以下を追加
@theme {
    /* Font families */
    --font-eng: 'Josefin Sans Variable', sans-serif;
}
コメント